Concrete Pond Build Methods
The choice of concrete wall construction methods are either by wooden shuttering formers, which is the task for a specialist or by way of an ample wall width of solid concrete blocks built onto the correct depth of concrete base after first curing.
In my experience, whilst delivery of ready-mix concrete is more expensive to buy than to mix by hand, there is an enormous labour saving aspect to be considered here. Today there is much competition in the supply of pre-mixed concrete and prices are well-worth investigating.
It is rare, if ever, that any two Koi ponds are identical but I would suggest a minimum final water depth should be five feet (1.55m) and the pond walls should be vertical in order to be able to hold a maximum volume of water within the available ground space allocated. Depths of three metres or more are not recommended as daylight will not penetrate strongly enough to produce the vital and fine moss-like algae on the pond base in ample quantity and so the base area is wasted. An ideal depth should be around seven feet (2.15m).
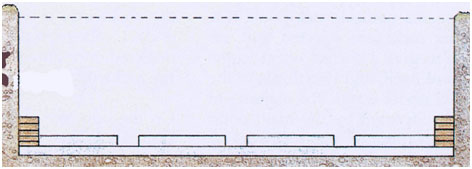
Typical concrete base formation and concrete block wall construction for a 3-drain pond.
I have included this section illustration to give an indication of good pond build details, which will be included in far greater depth later.
This example is of a 3-drain system but can be applied to the build stages of any size of pond.
-
1. A prime 6” deep (30cms) concrete base is cast and allowed to cure. In smaller set-ups one could ‘chance’ siting the drain on a paving flag depending on ground conditions.
-
2. Next the drain sumps and 4” (110mm) drain lines are exactly placed on the prime base, the lines are taken out of the pond via a suitable trench to the filter area.
-
3. Next, five courses of pond walls – 9” wide (23cms) are constructed all around the pond directly on the prime base perimeters.
-
4. Next, a second 6” deep (30cms) concrete base is cast to encase the drain sumps and pipe lines to the stage seen above.
-
5. After the walls are completed, they can be rendered and gentle slopes made to the perimeter of each sump.
Pond and filter concrete bases also require a time to cure once they have been cast and the walls also need time to dry out. The actual length of time required for curing does depend on weather conditions as well as the mix used. However, professional builders generally allow the specific curing time for bases at 28 days. It would be prudent to seek the advice from a good local builder who will be very aware of this information for your own area.
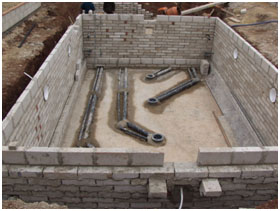
This is a four-drain set-up showing the drain layout before the second base is poured to encase them.
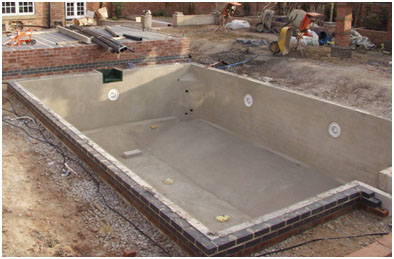 One can also see here the pond corners being ‘rounded-off’ to allow for better circulation by removing the 90-degree angle. In this example, the pond will be entirely ‘in-ground’ and so a double course of 4.5” (11.5cms) solid blocks provides a 9” thick wall before rendering and back filling.
This is an ample wall thickness for this particular pond and shows the pond ready for final waterproofing. It pictures the two purpose-made surface skimmers to each end and pond lights built into the walls that were insisted upon by the client and not suggested by myself – HONESTLY!
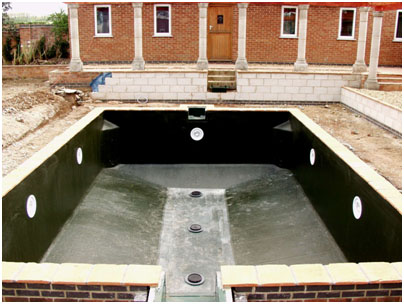 This shows the pond after final waterproofing by glass fibre to produce a very smooth finish on all surfaces. It also shows the diffuser drain tops in place and the triangular shapes at the end of the pond safely accommodate return water lines to the pond after filtration has taken place. A formal coping stone finish has been added after the glass fibre has been finished under the coping itself.
If you decide to go for my choice of final waterproofing which is glass-fibre, please do not consider this as a DIY project unless you are fully aware of this kind of work. There are guys around the UK who do this skilled work on a daily basis – Sean Hunter and Dave Arnold pond fibreglassing come to mind here. Email me if you need contact details.
Although this next text really relates to final landscaping which is an entirely different subject to pond build, if you plan to incorporate a ‘rock pond’ finish to your system then it has to be accounted for in the pond build.
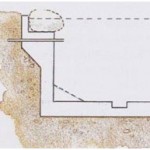 This sketch shows how to disguise ‘overhanging’ rockwork perfectly by building a retaining wall behind the rockwork, which finishes slightly above the final water level shown, thus allowing no water to escape. The top of the wall can be completely disguised by final gravel or soil landscaping.
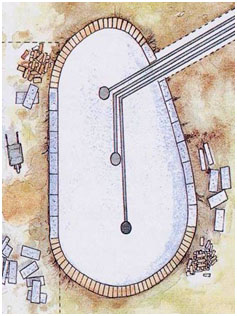 In this example the prime 6” (15cms) concrete base has been laid to the excavation. The 6” (15cms) sump to the bottom drain and the 4” (110mm) drain line will be encased by a second 6” (15cms) base later.
The pond wall here is 9” (22cms) wide and has been built in concrete block. The dotted line to the left of the base shows the vital slope to be produced in final rendering of the pond that will induce mechanical debris and dissolved toxins to be taken to the drain itself. After this, the pond will be ready for final waterproofing.)
Note how radius lines can be made by using common concrete bricks instead of longer concrete blocks that are ideal for straight runs of wall. By ‘back filling’ the wall during build this will provide a stable base for the rockwork shelf when the correct level is reached.
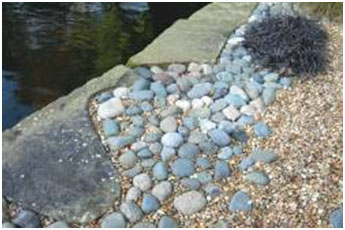 The photograph opposite shows a hidden retaining wall constructed behind the rockwork that has been landscaped afterwards with gravel and stones to show no trace at all of the retaining wall itself.
Please also be aware; that despite the protestations from some, our Koi will NOT ‘damage themselves’ on submerged rock landscaping in a pond. Like all species of fish, they have the finest radar systems in the world built into their very noses!


