Although Koi pond design and Koi pond filtration plays a very major part in the overall hobby that encompasses all aspects of ‘Koi keeping’, from my experience, there is nothing at all complex in achieving what we need to achieve in order to reach absolute perfection today, especially if the necessary, pure common-sense is applied.
Instead, and I assure you, it is simplicity itself and extremely logical. Furthermore, as I see it, it also does not need to even be remotely costly. Once we have a total understanding of each and every aspect of a system then we should be able to grasp exactly what is required.
We then need to investigate the very best designs and incorporate the very best items available to us all as of now. Here is a very simplified sketch of what we should all be trying to achieve to this end.
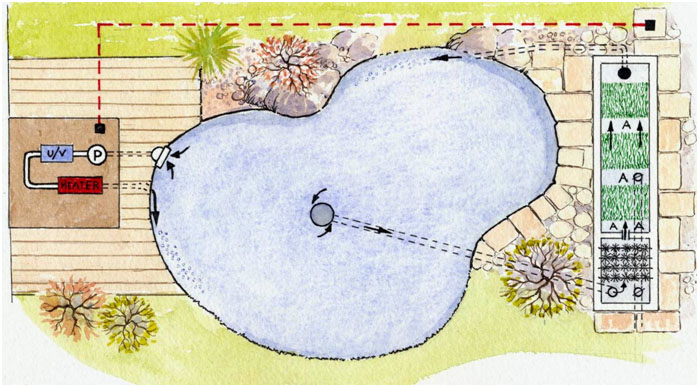
The Plan
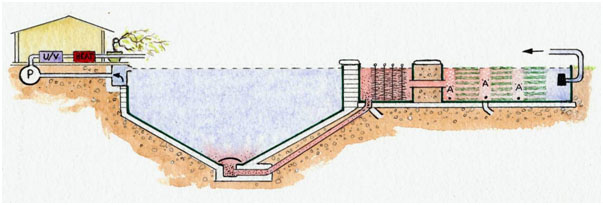
The Section
Note – This section is only an exaggerated pond sketch to purposely highlight debris and toxins, the pond base shown is far too steep!
This small, fictional example is a ‘gravity-fed’ in-ground and fully mature, finished system containing a total volume of 3,300 UK gallons (15 tons) of water.
It is a ‘two-pump system’ as follows: –
The first pump powers the filtration directly from the pond bottom drain and thence back to the pond in an anti-clockwise flow and with a minimum length of 2” return pipe work. The required flow rate of water from the filter back to the pond is around 1,320 gallons per hour, producing a total pond volume turnover once every 2.5 hours.
This pump obviously needs to be operated at all times without other restrictions in the return line.
The second pump picks up water supply from the surface skimmer to power the U/V and the heater and then returns water to the pond also in an anti-clockwise flow.
This pump line needs only to be used to: –
-
Skim the pond surface as required, eight hours per day should be ample; this can be regulated by a simple timer control.
-
Operate the U/V only in periods of green water.
-
Add heat to the system if ever required.
The above important facilities are vital should they ever be required but by including them in this way, there are significant savings to be made on electricity usage.
You will note upon studying this very important drawing that the red stains and black spots, close to the bottom drain in the pond, denote all the contaminants we need to be able to remove constantly.
The black spots attempt to represent mechanical debris whilst the varying red shades of colour attempt to represent dissolved toxins by way of dangerous ammonias that are constantly produced by the Koi.
Both the black and red spots are heavier than water and eventually fall to the depths of the water column.
(All of this will be covered in great depth later in this section of the site, for the moment, please just take a few minutes to take the drawing in.)
As the contaminants travel along the drain tube to enter the mechanical stage of the filter by simple gravity flow, the black and red stains remain to be the same in ‘overall contamination’ as do the lower depths of the pond.
However, after this water has been processed by the mechanical filter, the pipeline connecting the mechanical filtration to the biological filtration is intended to show a successful removal of some 85% of the black spots courtesy of the mechanical filter whilst the water still contains exactly the same content of toxic red stains.
After the biological filter has processed this water, the water is now blue in colour to denote good water when it reaches the pump. This remains to be so whilst on its journey back to the pond.
Note the anti-clockwise return flows to the pond; these are both in 2” bore tube and enter the pond around mid water depth. It is unimportant whether you decide on clockwise or anti-clockwise flow.
(On the section view I have shown the mechanical and biological stages separately to highlight removal of mechanical debris and processing of dissolved ammonia content.)
This sketch above details, very clearly, how a mature filter ‘should’ operate properly. The following texts on filtration design later will go to prove how it ‘will’ work properly – and that’s a promise!
The reader will also note, just for example purposes that the mechanical stage is shown as one box and the biological stage is shown as another box. This is exactly as intended, as the two stages of filtration perform two completely different functions.
As a result, filter boxes, over the years, have been combined to process the two different functions in one box purely to economise on space and the production costs of the box itself.
The final product, after being manufactured and put on sale, has simply been referred to as a ‘filter’. If readers find my termination of ‘box’ to be offensive in any way, I apologise but, that is all they are, water-retaining ‘boxes’, irrespective of material, shape, colour or size. The design of these boxes for the benefit of all Koi enthusiasts, however, is paramount in the overall design of a perfect Koi pond filter system. Also in most ‘proper’ systems these boxes will be buried to appear visually only at ground level and so the major part of the box will be below ground. For my part, all I wish to see is the pond and the Koi – everything else should be well-disguised and out of view.
The reason as to why we always process mechanical debris first is obvious. If we tried to do this by putting the biological stage first, the surfaces of the biological media would simply be coated with mechanical sludge that would not allow for ample biomass to form and reproduce, any attempts of cleaning would also be a nightmare.
It can also be seen in the illustrations that both filter boxes are equipped with a discharge outlet of suitable bore, which is extremely important in the overall design.


